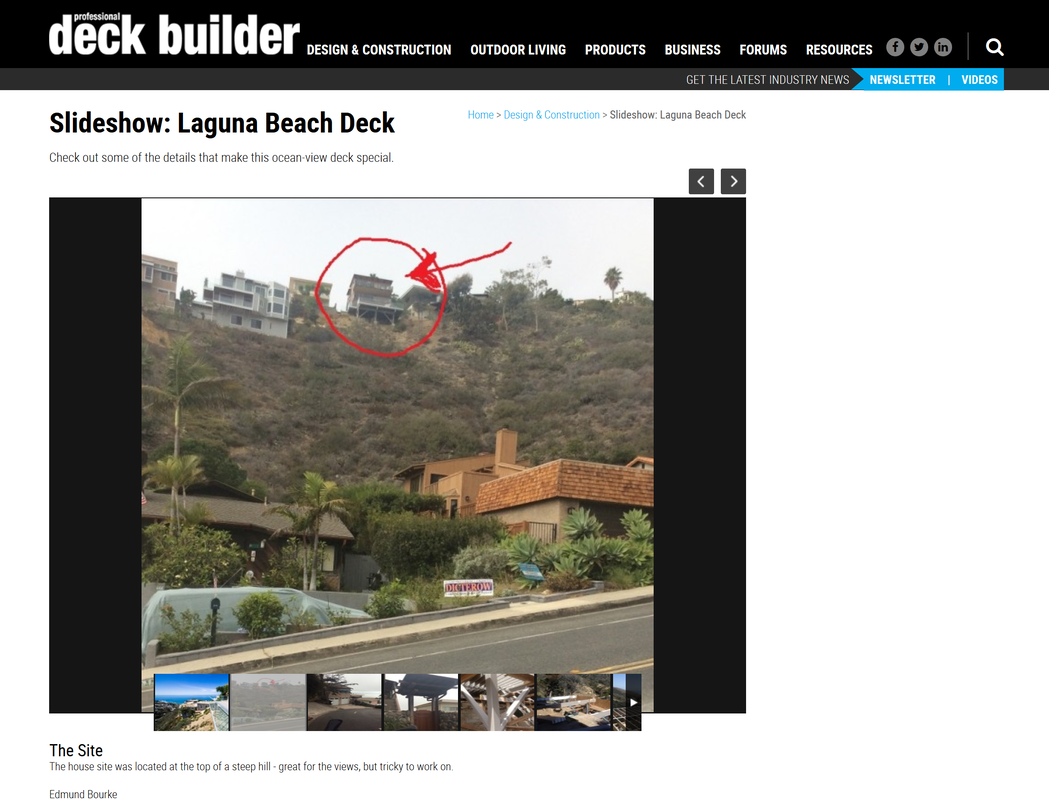
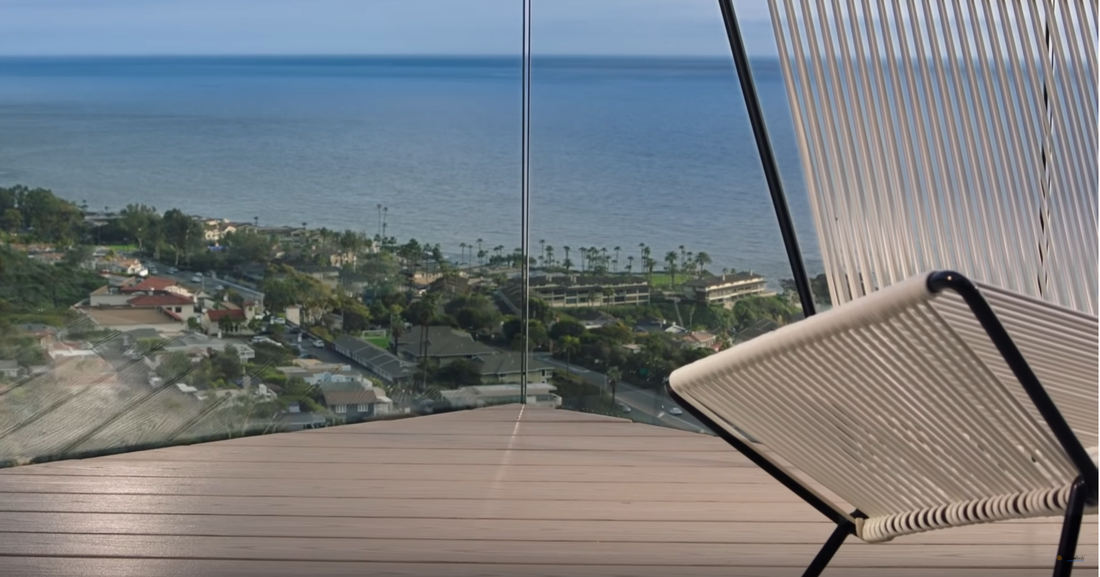
Bourke Construction - Orange County's #1 Remodeling Contractor
  • Home
  • Galleries
    • Additions
    • ADUs
    • Bathrooms
    • Decks & Landscaping
    • Doors & Windows
    • Kitchens
    • Painting
    • Remodeling
    • Roofing
    • NEW! Recent Projects
  • About Us
    • Client Testimonials
    • Contact Us
    • Meet the Team
    • Our Process
    • Prices
  • Free Estimates
  • What's Hot in 2026
    • Drought-Resistant Landscapes
    • Luxury Remodeling
    • Multi-Generational Living
    • Sustainable Construction Solutions
  • Blog

How to Set Up Getting a Bid on Your Construction Project

3/10/2026

0 Comments

 
Whether you're planning a remodel or an addition, getting an accurate construction bid starts with proper preparation. The way you structure the bidding process can directly impact pricing accuracy, timelines, and the likelihood of unexpected costs.

If you’re a homeowner in Orange County, CA, working with an experienced local contractor like Bourke Construction can make this process significantly smoother from the very beginning.

1. Schedule an On-Site Walkthrough
A reliable bid always starts with an in-person visit. While plans and photos provide helpful context, nothing replaces a contractor seeing the property firsthand.

An on-site walkthrough allows the contractor to evaluate existing conditions that may affect scope, feasibility, and budget. Every home has unique structural, mechanical, and site-related factors that influence pricing. Without seeing these in person, important details can be missed.

Bourke Construction conducts thorough on-site evaluations for Orange County homeowners to ensure bids reflect real conditions—not assumptions. This upfront diligence helps reduce surprises later in the project.

2. Evaluate Existing Infrastructure
When remodeling or expanding, your home’s existing systems must support the new work. During a walkthrough, a qualified contractor should assess whether current infrastructure can accommodate the project.

This includes reviewing core systems and identifying whether upgrades or modifications may be necessary. Addressing these items early allows them to be incorporated into the proposal rather than appearing later as change orders.

Specific examples include:
  • Are the current air conditioner condensers adequate for any new square footage in an addition?
  • Are the water heaters sufficient to handle additional bathrooms?
  • Are electrical breaker boxes able to handle additional electrical load in the case of remodeling and additions?

Because Bourke Construction is familiar with the housing stock and permitting environment throughout Orange County, CA, they understand common challenges in local homes and can anticipate potential issues before construction begins.

3. Provide a Clear Scope of Work
The clearer your vision, the more accurate your bid. Before requesting pricing, gather:
  • A written description of your goals
  • Finish expectations
  • Known selections or preferences
  • Desired timeline

Bourke Construction works closely with clients during the preconstruction phase to clarify scope and align expectations. This collaborative approach ensures that pricing reflects your priorities and that nothing critical is overlooked.

4. Understand What’s Included
A construction bid is more than a number—it’s a detailed outline of what is and isn’t covered. Be sure to review:
  • Included scope
  • Exclusions
  • Allowances
  • Assumptions
  • Change order procedures

Transparency at this stage builds trust and prevents misunderstandings later. Bourke Construction emphasizes clear communication so homeowners feel confident about what they’re approving before work begins.


5. Compare Value, Not Just Price
If you’re gathering multiple bids, make sure each contractor is pricing the same scope. A lower proposal may reflect omissions rather than savings.

Choosing a contractor based solely on price can lead to higher costs later if critical items were excluded. Instead, focus on experience, communication, transparency, and local expertise.

For homeowners in Orange County, CA, Bourke Construction offers the advantage of local knowledge, established trade relationships, and a commitment to detailed preconstruction planning—all of which contribute to more predictable outcomes.


Why the Right Contractor Matters
Many construction challenges stem from incomplete planning rather than poor craftsmanship. When your contractor takes time to understand your home, clarify your goals, and carefully prepare the bid, the entire project benefits.

Working with a trusted local builder like Bourke Construction means:
  • More accurate budgeting
  • Fewer change orders
  • Clear communication
  • A smoother construction process

If you're considering a remodel or addition in Orange County, CA, starting with a detailed on-site consultation is the first step toward a successful project. Bourke Construction helps homeowners move from concept to construction with confidence—beginning with a well-prepared, transparent bid.
0 Comments

Interior Doors: Solid vs. Hollow Core

3/2/2026

0 Comments

 
When upgrading your home’s interior, doors are often overlooked—but they play a major role in privacy, noise control, and overall quality. One of the most common questions homeowners ask is whether solid interior doors are worth the investment compared to hollow core doors.

If you’re planning a remodel or home upgrade in Orange County, California, understanding the pros and cons—and working with a trusted local contractor like Bourke Construction—can help you make the right decision.

What’s the Difference Between Solid and Hollow Core Interior Doors?
  • Solid interior doors are constructed from solid wood or a dense engineered core. They are heavier, more durable, and provide better sound insulation.
  • Hollow core doors have a lightweight interior, often a cardboard honeycomb, and thin outer panels. They’re commonly used in budget-friendly builds.
Homeowners throughout Orange County often choose solid interior doors for primary living spaces where comfort and quality matter most.

Benefits of Solid Interior Doors for Orange County Homes

Improved Soundproofing
Solid doors reduce noise transfer between rooms, making them ideal for:
  • Bedrooms
  • Home offices
  • Nurseries
  • Media rooms
This is especially valuable in busy households or multi-story homes common throughout Orange County.

Increased Privacy
Because of their dense construction, solid interior doors offer better privacy than hollow core doors—both visually and acoustically.

Long-Lasting Durability
Solid doors are more resistant to dents and damage, making them a smart long-term investment for homeowners looking to avoid frequent replacements.

High-End Look and Feel
Solid interior doors add a premium feel to your home and elevate the overall interior finish—an important factor in Orange County’s competitive housing market.

Added Home Value
Upgrading to solid doors can improve resale appeal, particularly in cities like Irvine, Newport Beach, Costa Mesa, and surrounding Orange County communities.

Downsides of Solid Interior Doors

Higher Initial Cost
Solid interior doors cost more than hollow core doors, both in materials and labor.

Professional Installation Required
Due to their weight, solid doors require proper framing, reinforced hinges, and precise alignment to function correctly.

Climate Considerations
In Orange County’s coastal and inland climates, solid wood doors must be properly installed and sealed to prevent warping—making professional installation especially important.

When Hollow Core Doors Still Make Sense
Hollow core doors may be appropriate for:
  • Closets and pantries
  • Laundry rooms
  • Utility spaces
  • Budget-focused renovations
However, they offer minimal sound insulation and tend to wear out faster over time.

Solid Interior Door Installation in Orange County, CA

Choosing the right door is only half the job--proper installation is critical to performance and longevity. That’s where Bourke Construction can help.

Bourke Construction provides professional interior door installation services throughout Orange County, California. Their experienced team specializes in installing solid interior doors that operate smoothly, look great, and last for years.

Bourke Construction Can Help With:
  • Solid interior door installation and replacement
  • Framing and hinge reinforcement for heavier doors
  • Remodeling and home improvement projects
  • Single-room upgrades or whole-home door replacements

Whether you’re updating one bedroom or replacing every interior door in your home, Bourke Construction ensures your project is completed with quality craftsmanship and attention to detail.
0 Comments

Bourke Construction of Orange County, CA Awarded Best of Houzz 2026

2/14/2026

0 Comments

 
Bourke Construction of Orange County, CA has won a “Best of Houzz - Powered by Houzz Pro” award for Customer Service on Houzz®, the leading all-in-one software platform for construction and design. The family-owned company is celebrating its 30th Anniversary in 2026 and was chosen by the millions of homeowners that comprise the Houzz community from among more than 3 million active home building, remodeling and design industry professionals.

The 2026 Houzz Customer Service Award honors professionals for their overall rating on Houzz and positive client reviews for projects completed in 2025. 

“Best of Houzz 2026” badges appear on winners’ profiles as a sign of their commitment to excellence. These badges help the more than 70 million homeowners and home design enthusiasts on Houzz to identify popular and top-rated home professionals for their projects.

“The Best of Houzz awards are a symbol of trust for homeowners when they are choosing professionals for their projects,” said Liza Hausman, vice president of Industry Marketing for Houzz. “This year’s winners showcase outstanding creativity and service, with many embracing Houzz Pro software to support top-tier project execution. We’re honored to celebrate their success.”

You can see more of Bourke Construction’s work on Houzz here.

0 Comments

Air Conditioning & Heating Systems

2/4/2026

0 Comments

 
Choosing the right heating and cooling system is a major decision for homeowners in Orange County, California. With rising energy costs and more homeowners remodeling, many are asking whether mini-split air and heat systems are a better option than traditional central air conditioning and heating systems.

Below, we break down the pros and cons of mini-split systems—and explain how Bourke Construction can help with professional installation throughout Orange County.

What Is a Mini-Split HVAC System?

A mini-split system, also known as a ductless HVAC system, uses an outdoor condenser connected to one or more indoor air-handling units. These systems provide both heating and cooling without relying on ductwork.

Traditional HVAC systems use a central furnace and air conditioner connected to ducts that distribute air throughout the home.

Benefits of Mini-Split Systems for Orange County Homes

High Energy Efficiency

Mini-split systems are highly efficient because they:
  • Eliminate energy loss from ductwork
  • Use inverter technology to adjust output based on demand
This efficiency makes mini-splits especially attractive in Orange County’s mild climate, where heat pumps perform exceptionally well.

Zoned Temperature Control

Each indoor unit can be controlled independently, allowing homeowners to:
  • Heat or cool specific rooms
  • Avoid wasting energy on unused spaces
  • Customize comfort throughout the home
Zoning is ideal for multi-story homes, home offices, and households with varying comfort preferences.

No Ductwork Required

Mini-splits are perfect for:
  • Older Orange County homes without ducts
  • Home additions and remodels
  • ADUs and garage conversions
Because no ductwork is needed, installation is faster and less invasive than traditional systems.

Quiet Operation

Mini-split systems operate quietly, making them a popular choice for bedrooms, nurseries, and living spaces.

Heating and Cooling in One System

Most mini-splits function as heat pumps, providing year-round comfort from a single system—no separate furnace required.

Downsides of Mini-Split Systems

Higher Initial Cost

Mini-split systems typically cost more upfront than basic central HVAC systems, especially when multiple indoor units are required.

Visible Indoor Units

Wall-mounted units are visible, which may not appeal to homeowners who prefer the hidden look of traditional vents.

Not Always Ideal for Large Homes

For very large homes, installing enough indoor units to maintain consistent comfort can increase costs.

Maintenance Across Multiple Units

Each indoor unit requires routine cleaning and maintenance to ensure optimal performance.

Traditional HVAC Systems: Pros and Cons

Pros
  • Well-suited for large homes
  • Hidden appearance (vents only)
  • Often lower upfront cost when ducts already exist
  • Simple maintenance with a single system

Cons
  • Energy loss through ductwork
  • Limited zoning without expensive upgrades
  • Not ideal for homes without existing ducts

Mini-Split Installation in Orange County, California

Choosing the right system is only part of the process--professional installation is critical for efficiency, performance, and longevity. That’s where Bourke Construction can help.

Bourke Construction provides mini-split air and heat system installation throughout Orange County, CA, working with homeowners on remodels, additions, ADUs, and energy-efficient upgrades.

Bourke Construction Can Help With:
  • Mini-split HVAC installation and replacement
  • System planning for zoning and room layout
  • Installation for home additions and ADUs
  • Coordinating HVAC upgrades with remodeling projects

Their team ensures your mini-split system is properly sized, strategically placed, and professionally installed for long-term comfort and efficiency.

Is a Mini-Split System Right for Your Orange County Home?
Mini-split systems are ideal for:
  • Homes without ductwork
  • Room additions or conversions
  • Energy-conscious homeowners
  • Spaces with uneven temperatures
Traditional HVAC systems may be better for:
  • Large homes with existing ducts
  • Homeowners who prefer hidden systems
  • Whole-home replacements with minimal remodeling
0 Comments

Pine Wood vs. MDF - A Comparison

1/30/2026

0 Comments

 
Here are the top reasons people choose pine wood over Medium-Density Fiberboard (MDF) — and why experienced remodeling contractors like Bourke Construction often recommend it for long-lasting projects in Orange County, California:

1. Strength & Structural Integrity
Pine wins for anything that needs to hold weight.
  • Pine is a solid wood with natural grain strength
  • Handles screws, nails, and joints far better
  • Less likely to snap or crumble under stress
MDF is dense but brittle—fine for flat panels, but a poor choice for load-bearing parts like legs, rails, or frames. At Bourke Construction, material selection is always based on how a space will actually be used, not just how it looks on day one.

2. Screw-Holding Power
This is a big one in real remodeling projects.
  • Pine grips screws securely
  • MDF can strip easily, especially near edges
  • Repeated assembly or adjustments quickly weaken MDF
For cabinetry, built-ins, and custom features meant to last, pine offers the reliability homeowners expect from a professional remodeling contractor.

3. Moisture & Humidity Resistance
Pine survives moisture mistakes; MDF does not.
  • Pine may swell or warp slightly but remains usable
  • MDF absorbs water like a sponge and permanently swells
  • Even high humidity can damage MDF over time
In Orange County homes—especially kitchens, bathrooms, and coastal areas--Bourke Construction prioritizes materials like pine that can better handle real-world moisture conditions.

4. Durability & Longevity
Pine ages. MDF just… degrades.
  • Pine can last decades (or even centuries) with proper care
  • Can be sanded, refinished, and repaired multiple times
  • MDF breaks down once damaged, with little chance of recovery
For homeowners investing in a remodel, longevity matters—and pine delivers.

5. Natural Aesthetics & Character
Even when painted, pine has character.
  • Visible grain, knots, and warmth
  • Can be stained, oiled, waxed, or painted
  • Each piece is unique
MDF has no natural grain, which limits design flexibility. Bourke Construction often recommends pine when clients want warmth, character, and timeless appeal in their remodel.

6. Lighter Weight
Surprisingly important during installation.
  • Pine is lighter and easier to handle
  • MDF is very heavy for its size
  • Easier installation for wall-mounted or custom pieces
This makes pine especially practical for custom shelving, built-ins, and cabinetry during remodeling projects.

7. Health & Environmental Considerations
Pine is the more natural option.
  • Solid pine contains fewer chemicals
  • MDF uses resins and formaldehyde (even low-VOC versions)
  • Pine is easier to recycle or reuse
For homeowners concerned about indoor air quality, Bourke Construction often steers clients toward solid wood solutions like pine.

8. Better for Traditional Joinery
If craftsmanship matters:
  • Pine works well with mortise & tenon, dovetails, and dowels
  • MDF relies mostly on glue and screws
  • MDF edges are fragile and chip easily
MDF is a manufacturing material. Pine is a true woodworking material—one that supports the level of craftsmanship Bourke Construction brings to every remodeling project in Orange County.
0 Comments

Water Heaters: Tankless vs. Traditional

1/26/2026

0 Comments


Choosing the right water heater is an important decision for any homeowner. One of the most common questions is whether a tankless water heater is a better option than a traditional tank-style water heater. While both systems provide reliable hot water, they differ in performance, efficiency, cost, and installation requirements.

Understanding these differences—and working with an experienced contractor like Bourke Construction—can help ensure you choose and install the system that best fits your home and lifestyle.

What’s the Difference Between Tankless and Traditional Water Heaters?
  • Traditional water heaters store and heat a set amount of water in a tank, typically 40–80 gallons.
  • Tankless water heaters heat water on demand, providing hot water only when you need it without storing it in a tank

Both options can work well when properly sized and installed by a qualified professional.


Pros of Tankless Water Heaters

Endless Hot Water
Tankless systems provide hot water on demand, making them ideal for households with higher usage or multiple bathrooms.
Improved Energy Efficiency
Because they only heat water when needed, tankless water heaters reduce standby energy loss, potentially lowering utility bills over time.
Longer Lifespan
Tankless systems often last nearly twice as long as traditional water heaters, making them a solid long-term investment.
Compact, Space-Saving Design
Their wall-mounted design frees up valuable space, especially in garages, closets, or utility rooms.

Cons of Tankless Water Heaters

Higher Upfront Cost
Tankless units and their installation typically cost more upfront than traditional systems.
Installation Requirements
Some homes require gas line upgrades, electrical improvements, or specialized venting to support a tankless system.
Flow Rate Limits
Without proper sizing, tankless systems may struggle to supply hot water to multiple fixtures at the same time.

Pros of Traditional Water Heaters
  • Lower initial cost
  • Straightforward installation
  • Familiar and reliable technology
  • Well-suited for smaller households

Cons of Traditional Water Heaters
  • Limited hot water supply
  • Higher ongoing energy use
  • Shorter lifespan
  • Greater risk of leaks or tank failure

Professional Water Heater Installation with Bourke Construction
Whether you choose a tankless water heater or a traditional tank system, proper installation is essential for performance, safety, and longevity. Bourke Construction provides professional water heater installation services to help homeowners make the right choice and ensure their system is installed correctly.

Bourke Construction Can Help With:
  • Evaluating your home’s hot water needs
  • Recommending the right tank or tankless system
  • Handling required plumbing, gas, or electrical upgrades
  • Installing and replacing water heaters safely and efficiently
  • Supporting remodels, additions, and full home upgrades

Their experience allows them to install both tankless and traditional water heaters while coordinating with other home improvement projects.
0 Comments

The Deck With the Million Dollar View

1/14/2026

0 Comments

 
Picture
0 Comments

Major Kitchen Remodel – Steps in Order

1/8/2026

0 Comments

 
1. Pre-Construction & Planning
• Finalize design, layout, and selections (cabinets, appliances, finishes)
• Verify appliance specs (gas vs electric, venting, clearances)
• Obtain permits (building, electrical, plumbing, gas)
• Order long-lead items (cabinets, windows, custom appliances)

2. Site Prep & Protection
• Protect floors, adjacent rooms, and pathways
• Set up dust control and debris removal plan
• Shut off water, gas, and electrical as needed
 
3. Demolition
• Remove cabinets, countertops, backsplash
• Remove appliances
• Demo drywall/plaster as required
• Remove flooring (if replacing)
• Open walls/ceilings for new services
 
4. Rough Framing & Structural (If Needed)
• Wall removals or additions
• Header installation
• Soffit removal or construction
• Floor leveling or reinforcement
 
5. Rough-In Utilities (Services)

Plumbing
• Relocate sink, dishwasher, fridge water line
• New drain, vent, and water supply lines 

Gas
• New or relocated gas lines for range or dryer
• Pressure test & inspection

Electrical
• New circuits (appliances, lighting, outlets)
• GFCI/AFCI as required
• Under-cabinet lighting rough-in
• Island outlets
• Panel upgrades (if needed)

HVAC / Venting
• Range hood ducting (roof or exterior wall)
• Make-up air (if required by code)

➡️ Rough inspections
 
6. Insulation
• Exterior wall insulation
• Sound insulation (optional)
 
7. Drywall
• Hang drywall
• Tape, mud, sand
• Texture (if applicable)
 
8. Prime & Paint (First Coat)
• Prime all walls and ceilings
• Paint ceilings and first wall coat  
 
9. Flooring
• Install new flooring
(Some contractors install flooring after cabinets—depends on material)
 
10. Cabinet Installation
• Set base cabinets
• Set wall cabinets
• Install panels, fillers, crown molding
 
11. Countertops
• Template after cabinets are installed
• Fabrication period
• Countertop installation
 
12. Tile Backsplash
• Tile installation
• Grout and seal
 
13. Finish Plumbing
• Install sink
• Install faucet
• Install garbage disposal
• Install dishwasher connection
 
14. Finish Electrical
• Install outlets and switches
• Install lighting fixtures
• Under-cabinet lighting
• Install microwave / hood
• Appliance hookups
 
15. Appliance Installation
• Range
• Refrigerator
• Dishwasher (if not already installed)
• Microwave / hood
 
16. Cabinet Hardware
• Install handles and knobs
• Adjust doors and drawers
 
17. Final Paint & Touch-Ups
• Final wall paint coat
• Caulking
• Trim touch-ups
 
18. Final Inspections & Walkthrough
• Final inspections (building, electrical, plumbing)
• Test appliances and fixtures
• Punch list completion
• Final cleaning 
0 Comments

Retrofitting a Rooftop Deck to a Stucco Home

1/4/2026

0 Comments

 
Bourke Construction was featured in a Journal of Light Construction article that illustrated our process of converting unused attic space into a rooftop deck. 

The article is copied below. For the full article with additional pictures, visit Journal of Light Construction. 
Picture
Located midway between Los Angeles and San Diego, Dana Point is a mid-sized coastal community with million-dollar views of the Pacific Ocean and real estate prices to match. So our client’s decision to remove a perfectly good, clay-tile roof over an unused attic space on her home and replace it with a 450-square-foot rooftop deck to gain more outdoor living space and a better vantage point for viewing ocean sunsets made perfect sense.

Her 2,200-square-foot home is located on a small, pie-shaped lot in a gated community with strict wind, seismic, fire, and drainage requirements. To meet those requirements, we plans that were designed and engineered by Leo Burke Engineering of Dana Point. In addition to building the new deck, we replaced a pair of small windows with bi-folding patio doors, which allowed access to the deck from the two second-floor bedrooms, and installed a new outdoor gas fireplace. Also, to provide access to the deck from the existing patio and pool area, we built a seismically reinforced set of stairs. On the interior, the engineers spec’ed a retrofitted shear wall tied to a new grade beam to seismically reinforce the home.

The roof that was slated for demolition enclosed attic rather than living space, but there were still plenty of existing electrical and gas lines and AC duct­work running through the space that had to be rerouted. After carefully removing the clay tiles to save them for later repairs to the remaining roof, but before dismantling the sheathing and existing truss roof system, we installed temporary walls in the first-floor master bedroom and family room to support the drywall ceilings from below. Combined with weather protection from above, the walls would allow the homeowner and her constant companions—a pair of large Labrador retrievers—to remain in the house during construction.

We left the bottom chords intact as we started disassembling the roof trusses, leaving the drywall ceiling fastened to the chords and the back of the drywall exposed. Then, as we removed what was left of the trusses, we were careful to minimize damage to the drywall. Though we had to pull fasteners out through the back of the drywall, the paper face remained fairly intact, which made patching the ceiling later on easier.
Then we stripped away the stucco finish from the wall to expose the framing so that we could fasten a 9 1⁄4-inch PSL ledger to the house with structural screws. We also installed a PSL rim joist on top of the existing wall plate, then hung 9 1⁄4-inch PSL ceiling joists from the ledger and rim joist 16 inches on-center, fastening the joists to the ledger with joist hangers.

This rooftop deck was designed to drain to the center rather than along the outside edge. So before hanging the joists, we ripped V-shaped tapers along their top edges from both ends toward the middle so that the roof sheathing would slope away both from the house and from the edge of the deck toward the center. With a slope of 1⁄4 inch per foot, these tapers still left plenty of material—about 7 inches—in the middle of the joists to support roof loads on the 14-foot-wide deck.

After the joists were in place, we reconnected the HVAC ducts to supply the existing registers and rerouted the electrical and gas lines as needed so to bury everything within the ceiling framing. We also installed three pairs of 3-inch-diameter schedule 40 drainpipe that would connect roof drains in the center of the deck to a 6-inch seamless aluminum gutter mounted on the fascia, allowing water to drain off the deck and down to the home’s existing drainage system. After insulating the joist bays with fiberglass batts, we glued and nailed 3/4‑inch sheathing to the joists.

Originally, the designer had determined that three 3-inch-diameter drains—one in the center and one at each end—would provide the necessary capacity to handle water flowing off the deck. We decided to play it safe and doubled up the drainage capacity by installing two drain lines instead of just one at each location, in case of a heavy rain event or a drain blockage from debris. The drains exit through the rim joist and empty into a gutter.

We installed the six flanged drain bodies when we installed the sheathing, but we subcontracted the roof deck waterproofing to another company. Those workers taped the joints in the sheathing, applied a primer/sealer, and flashed around the perimeter of the deck. Next, they stapled diamond lath to the sheathing and applied a three-coat stucco finish.

To waterproof the deck, the crew rolled on Silcor 575 liquid-applied polyurethane waterproofing membrane over the stucco finish. Then they applied a rolled-on coat of Silcor Top Coat 80 finish, followed by a sprayed-on texture coat. Later, the deck surface was spray-painted to match the finishes on the rest of the house.

With the roof deck installed and the living space below fully protected from weather, our next task was to strip back the remaining stucco on the gable end wall and prep the framing for the new bi-fold patio doors to replace the small windows in each upstairs bedroom. In addition to framing the new rough openings for the doors, we installed T-straps and other metal hardware to reinforce the wall. At the same time, we stripped the stucco from the lower level so we could access the wall framing to let in diagonal bracing, part of the package of seismic retrofits included in the project.

To make room for a new direct-vent gas fireplace for the rooftop deck, we reconfigured an existing chimney chase, which contained the vent for a gas fireplace in the living room. Instead of being oriented vertically, the new chase is framed as a low wall, providing the deck with a little bit of visual separation from the neighbors.

The new LaCantina bi-fold doors were specced to match the home’s existing doors on the ground floor and were installed by the window and door supplier. After the doors were fitted and flashed, our crew returned to insulate the wall cavities, staple up a double layer of building paper integrated with the door flashings and other wall flashings, install the metal lath, and apply a traditional three-coat stucco finish to the walls and chimney chase.

The original plans called for a spiral staircase for access from the ground level to the upper deck, but the city building department asked for a more robust, seismically reinforced design. Our solution was to install a grade beam at the lower landing as well as a pier foundation for the upper landing, frame the landing like a moment frame, and connect the lower and upper landings with stringers cut from four 4×14 treated Douglas fir beams. After we installed plywood treads and risers, the stairs received the same stucco and Silcor finish as the roof deck, creating a dry space for storage underneath.

Because the home is located in an area that the city of Dana Point has designated a Very High Fire Hazard Severity Zone (VHFHSZ), certain construction elements applied to the project. While a retrofitted sprinkler system wasn’t required, the deck surface had to qualify as an ignition-resistant or noncombustible material per SFM Standard 12-7A-4 and 12-7A-5 in the California Building Code. We supplemented the three-coat stucco walking surface and new stucco wall surfaces with a fire-retardant paint.

To avoid obscuring the ocean views in any way, we installed a custom-fabricated glass-panel guardrail system, which is supported by fascia-mounted brackets. On the stairs, we installed a custom-fabricated wrought iron railing to match the home’s existing gates and fences. Lastly, we installed the new direct-vent fireplace.
0 Comments

Types of Stucco

12/14/2025

0 Comments

 
Picture
Types of Stucco Finishes

1.
Smooth Stucco Finish:
• This is the sleekest look, perfect for modern architecture.
2. Sand (Float) Stucco Finish:
• Features a grainy texture, which can be fine, medium, or coarse depending on the sand aggregate used.
3. Lace (Skip Trowel) Stucco Finish:
• One of the most popular, showing a layered, intricate pattern that looks like lace over a smooth base.
4. Dash (Roughcast) Stucco Finish:
• The roughest texture, characterized by small, stiff peaks of stucco sticking out from the surface.
5. Worm (Swirl) Stucco Finish:
• This finish features small, circular, or linear grooves created by the aggregate being dragged across the surface during application.

Key Considerations When Choosing a Finish

When selecting a stucco finish, you should think about:
• Architectural Style: A Smooth finish suits modern design, while Lace or Santa Barbara works well for traditional or Mediterranean homes.
• Maintenance: Smooth finishes are easiest to clean but show every imperfection and crack. Textured finishes like Lace or Dash are more forgiving and hide flaws better.
• Durability: Heavily textured finishes can be more resistant to weather and impact.
• Color Perception: Texture affects how color appears; smooth finishes can make colors look more vibrant, while heavy textures can make colors appear deeper due to shadows.

0 Comments
<<Previous

    Categories

    All

    RSS Feed

HOME
CONTACT US
BLOG
CAREERS
CLIENT TESTIMONIALS
privacy policy

© 2026 Bourke Construction INc.

FEATURED GALLERY
LAGUNA BEACH DECK REMODEL

  • Home
  • Galleries
    • Additions
    • ADUs
    • Bathrooms
    • Decks & Landscaping
    • Doors & Windows
    • Kitchens
    • Painting
    • Remodeling
    • Roofing
    • NEW! Recent Projects
  • About Us
    • Client Testimonials
    • Contact Us
    • Meet the Team
    • Our Process
    • Prices
  • Free Estimates
  • What's Hot in 2026
    • Drought-Resistant Landscapes
    • Luxury Remodeling
    • Multi-Generational Living
    • Sustainable Construction Solutions
  • Blog